Tuesday, June 15, 2010

Haus of Cookies

Muffin & Meatball are eschewing the teenage principle of


and have been working like fiends to raise money for summer camp!

Cookies for Camp, AKA Haus of Cookies is open for business!


They are making and selling chocolate chip, oatmeal scotchies & snicker doodles, so now my kitchen smells like Willy Wonka's 24/7.

I must admit, though, that I cannot vouch for how they taste. So far, they've made over 60 dozen and I just want you to know that because of the battle of the


I have eaten nary a one!


Thank you. Thank you very much.

They are also hiring themselves out to:

Babysit
Walk/ bathe dogs
Wash cars
Do laundry & fold
General office help
Household chores
Garden clean up
Garage clean up
Help serve at parties
Clean up after summer events


YOU NAME IT! They’re willing to clean it or do it! (Can you tell I'm so proud of them?)

And, as a bonus, they're totally CUTE!


OK, local friends, who has a job for these two adorable, hard-working teenagers?

Tuesday, June 8, 2010

A Slammin' Saturday Night

Last Saturday night, Sweetpea got a doozie owie.

Long story short, her right middle finger got slammed in a glass door which...


acted like a guillotine leaving her with a compound fracture between the last knuckle and the nail. We learned later was very nearly an amputation!


Zonked out waiting for x-ray results
with her Nana Blankie and her two teddybears


Poor little sweetie! I'm not going to share all the disgustivo pictures that Haus took of her finger all bloody and sticking out at a horribly unnatural angle because EEWWWWWW! (It's a Man Thing.) But, here's the sad x-ray.


As usual, Sweetpea was incredibly charming and hysterical at the ER, cracking up the nurses and the doctor. The surgery was brutal, though. I'm still beating myself up about not listening to the Holy Spirit when I knew He told me to choose sedation. Holding her through it was punishment to last a lifetime.

Right at the worst part, when the surgeon was stitching through her fingernail causing pressure against the severed bone (which the local anaesthetic didn't numb) and intense pain, she shouted at him,

"FIRST of all, that HURTS me!
And, SECOND of all...

AHHHHHHHHHHHHHHH!!!!"


Oh, my little love cannot help being funny, even in the worst pain of her life!

"I want you to STOP that immediately!
And, I want to go HOME
ABSOLUTELY immediately!"


It was "super no fun", but she did beautifully. Her finger is thankfully intact, although looking remarkly Frankensteiny. Prayerfully, her fingernail was not damaged too severely and will grow back.


Very excited about her cool bandage.

(Funny for the Naughty Files:
In the morning, she was so excited to show off to her baby sister.

"Cupcake! Look! This is my owie!
The doctor did a surgery
and it really dammit hurt!")

Saturday, June 5, 2010

Cupcake's New Braids

WELCOME to the scary hair experiment!


Being a novice at styling my precious little Cupcake's hair, I thought I'd try a fairly complicated, huge-time-investment, but potentially long-lasting hairstyle that very well may end in disaster! I'm wild that way.

Anyway, you mamas of African babes can commiserate with me about how high maintainance our sweeties' beautiful hair can be. Cupcake's is fine and soft (versus thick and coarse), so intricate hairstyles are a little frustrating because they just don't last very long.

Enter the BRAIDS or DREADS idea.


Since I'm a closet OCD, A-type personality, I then spent hours on the internet researching as well as asking tons of detailed questions of whomever would give me the time of day. Some people were afraid of the white lady wanting to touch and inspect their beautiful cornrows, dreads, or braids and would scamper away. But I run fast and I'm not afraid of tackling.

I foolishly thought that I could complete the entire thing in one sitting, but after 3 hours on Day One and only barely half-way done, my hands begged for mercy. And Cupcake was completely over being duct taped to her toddler chair, too.

On Day Two, I braided another few inches before calling it quits. That's when I realized that I should've been taking pictures. Duh!

OK, so we're starting quite a ways in, but don't worry, you'll catch up quickly. You're a fast learner.

Remember to always start with cleany-clean hair (Über important!) that's been conditioned well and picked out.


Here's a "Before" pic from the church picnic. (Terrible photo, but she's adorable anyway.)


Cupcake is so cute. She loves her hair and will occasionally pass by a mirror, appreciate her beauty, and say to herself,

"I'm wockin' da fwo!"
Translation: "I'm rockin' the 'fro!"


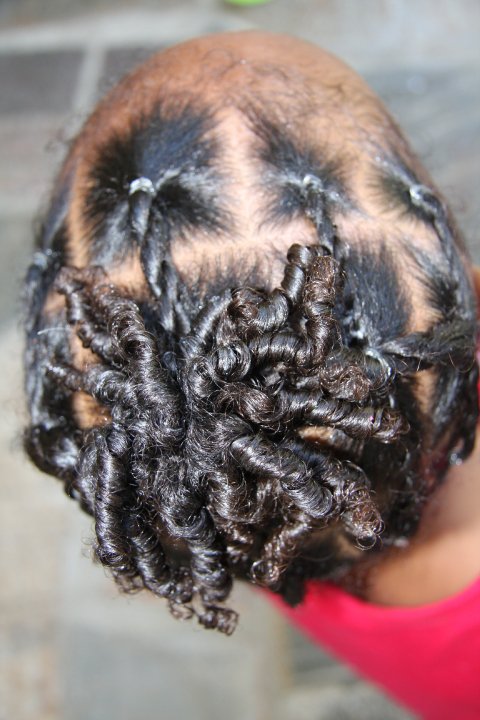
So, here are pictures starting on our final day (PraiseGodAlmighty!) of braiding.


This is what I did with the unfinished part until we were done. Ponytail. Twistie curls. Easy peasy.


This is the product I used. I highly recommend that you use a really good hair product, especially when you're doing a detailed hairstyle. It'll make the finished style look way better and it'll last a lot longer. Plus, Loc Butter smells awesome!


Step 1: Part the hair down the middle front to back. Straight parts are a must. (Read: Do what I say and not what I do. I actually have Straight Part Inability Disorder, SPID for short.)

Step 2: Part a row to braid and clip back the rest. These rows are about 1/2 inch wide.


Step 3: Separate a section in your row. Again, I'd mention the importance of straight parts here, but you know the drill. Use a dab of the Loc Butter and braid away.


At the end of each braid, twist a little curlie cue just because they're sweet.


Step 4: Repeat until you want to impale yourself.


Step 5: Resist the urge to just shave the rest of your munchkin's head when your hands start to cramp up into claws. Remember the stylist who told you she would only charge $350 and pat (as well as you can) yourself on the back for choosing the Do It Yourself Method.

*Tip: Do NOT consume alcohol at any point during the hair styling process. Stay strong.


Step 6: Gather up into cutie patootie ponytails. Let your little one basque in the beauty!


New morning hair routine: Spritz heavily with leave in conditioner. Scoop up about a quarter-sized amount of coconut oil (organic, unrefined, unbleached, un-everything) and run it over every strand and her scalp. Ponytails. Done. 3 minutes tops.


Style time: 9 1/2 hours over 3 days and nary a cuss word was uttered.

I'll let you know how it fares.


Is she killer cute, or what?!

Cupcake's Twisties Hairstyle


*As always, start with clean, well-conditioned hair.


Step 1: Part the hair and pony tail. OK, don't flip out. You can do this... Start by dividing the hair into three sections from side to side. Then divide each of those sections into five (or more if you're really brave) sections from front to back. Ponytail as you go using a little Carol's Daughter Hair Milk or Loc Butter in each section.


Step 2: Starting on one side, twist the back section and the front section and band together at the middle section. Repeat on the two outside sections on each side, but not the very middle section.

*Twists are made by separating a pony into two parts, twisting both hair sections in one direction (let's just say right), and then wrapping the opposite direction (left) to make a rope. Did I explain that well? Where's a web cam when you need one?


You should now have two ponytails on each side of the head (ignoring the middle row) that are gathered at the middle section. If you're confused, join the club... I mean, you're welcome to email me and I'll try to walk you through it.

Step 3: Comb out the outside two ponytails (the ones by the ears) thoroughly and then twist each and band together with the next one in.

Are you following?


Step 4: Comb those ponytails out thoroughly and twist each.

You should now have five ponytails. Four making a diamond around the one in the dead center.


Step 5: Gather all four twists to the center and comb out the final ponytail thoroughly. Hang in there. You're almost done. Put on another Charlie & Lola episode and you'll be home free!


Step 6: Curlie cue tiny little sections (with a dab of Hair Milk on each) to make a cute little ribbon pile of hair on top!


And SHAZAM! There you have it!


This style lasted on Cupcake for about 2 weeks.


And, personally, it's one of my favorites! (And so is my Cupcake!)


Style time: 1 hour

Hairstyle Ideas

First, keep in mind that I'm learning how to care for and style my Cupcake's hair purely by trial and error.

Second, a couple of product recommendations:

Carol's Daughter Hair Milk is very moisturizing, works great and smells even better. The only caveat is you've got to be careful not to use too much or you'll have a goopy mess on your hands!


Style #1 is pretty easy... I wish I could get those parts even and razor-sharp! If anyone has a trick or suggestion, please fill me in!


*Always start with clean hair. Wash thoroughly. Leave conditioner on for 5-10 minutes and rinse. Cupcake loves wearing a cute shower cap.


How cute are these? Shiny Shack carries them.

I love Carol's Daughter products. We just got CD's "A Magical Beauty" hair set. How adorable is that?


Step 1: Part the hair into equal sections and ponytail. You can do it. Just think "pie". Then, flip each ponytail inside out (separate in the middle and tuck the hair through) so that the braids lay down flat. (You can skip the flip - That should be a rap song! - if you put a few cute beads on the end of each braid.)

Step 2: Braid each pony and then twist the end. Voila! Easy peasy!

Cupcake wore this style for about 2 weeks. I think for little ones with coarser and thicker hair it would last even longer.

Styling time: Approx. 40 minutes, but I work slowly.


Style #2 is much easier than it looks.

*Again, always start with squeeky clean, well conditioned hair. I always style Cupcake's hair when it's wet partly because it's easier and looks smoother and partly because of my rebellious nature. :)


Step 1: Part the hair. Start by dividing down the middle from ear to ear. Then part each half into five (or more if you have the chutzpah for it!) sections front to back. Ponytail each section. Add Hair Milk as you go so everything stays silky smoothe.


Step 2: Starting at the front from one side gather one ponytail to the next and band together. Repeat until you have one large ponytail at the other side of the head.

You can also braid or twist each section to the next, comb out thoroughly and then repeat. The hairstyle lasts a lot longer that way.


Step 3: Repeat in reverse on the back side.


Step 4: Braid or twist the last section and end with a little curlie cue.


Ta da! Presto Cutie-o!


And, a big THANK YOU to our hair model, Cupcake! Isn't she a sweetie?

Style time: Approx. 30 minutes

Thursday, June 3, 2010

An Oldie But Goodie... Vanidad Goeth Before La Caída

Just for laughs... here's a rerun of a funny that happened last year.


Out to dinner in Cancún with my muchacho caliente, our waiter shyly asked me

"Are you a model?"


which put a little blush on my cheeks and some wind in my sails...

"Oh no, no, no... Gracias, señor!"

Then he put his hands out in the "I once caught a fish this big" position about nine inches on either side of his hips


and asked...


"Plus size?"


I didn't cry. Although it would have been awesome to make a huge scene bursting into tears and running out of the restaurant just for fun...


Seriously, though,

I'm boycotting that whole country now.

Forever.

That'll show 'im.